Family alert! Embrace the last of summer by using these activity videos from the C.S. Mott Children's Hospital's Camp Little Victors program.
9:00 AM
Author |
To soak up the last few weeks of summer, the Michigan Health blog will be posting some fun activity videos from Camp Little Victors, a virtual summer camp program led by C.S. Mott Children's Hospital.
By signing up for the camp, families receive a weekly email full of fun summer ideas from experts at Mott. From rainy day activities and kid-friendly recipes to summertime safety tips, each week is designed to help you and your family take advantage of the summer months in a fun and special way.
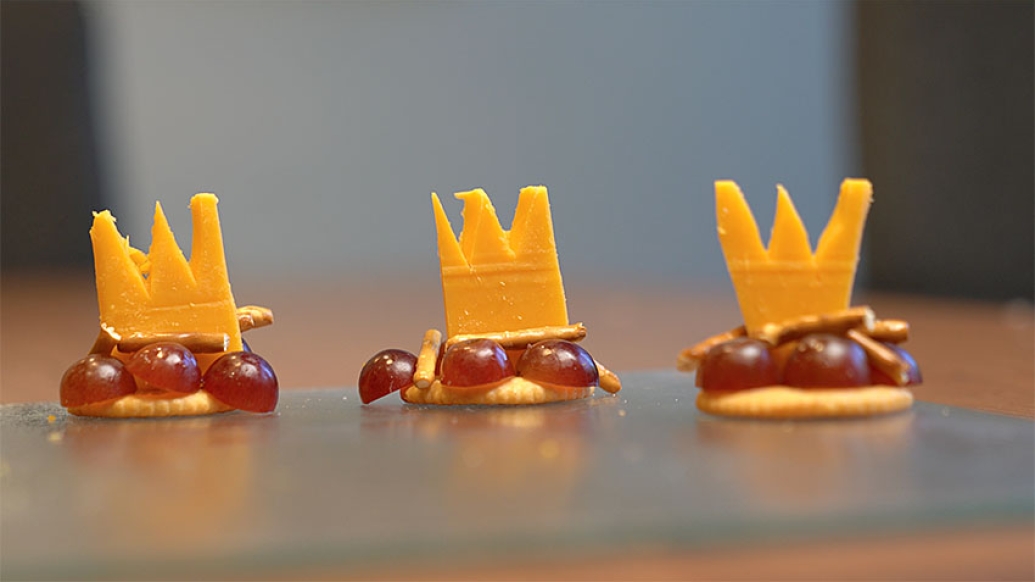
Campfire Crackers
Are you and your family wishing for a campfire, but the weather says otherwise? Then it's time to bring the campfire indoors and create this yummy, fireside treat!
What You'll Need:
-
Crackers
-
Cheese
-
Pretzel sticks
-
Grapes
Instructions:
-
Cut the grapes in half and place in a ring along the outer edge of the cracker.
-
Take a piece of cheese and cut flames on one end. Then place in the middle of the stones (aka the grapes).
-
Break the pretzels in half and pile them on the campfire to finish the snack.
NOTE:
-
To make gluten free: use gluten free pretzels
-
To make dairy free: use favorite dairy-free cheese or omit
-
Make sure grapes are sliced small enough to fit your child's specific needs. Grapes in whole form or sliced into rounds can be a choking risk.
This tasty treat was inspired by a recipe here.
Frozen Banana Yogurt Bites
Yogurt + Bananas = Tasty! Try out this delicious and nutritious treat that is sure to make everyone want to say B-A-N-A-N-A-S!
What You'll Need:
-
1 large ripe banana
-
1 cup yogurt of your choice
-
Pastry cups
-
Handful of dried banana chips (optional)
Instructions:
-
Lay out about 12 cupcake cases or silicone muffin cups on a small baking sheet or tray.
-
Peel the banana and place on a plate.
-
Mash up banana until most of the lumps have gone.
TIP: Young children might find this step easier to do with a potato masher if you have one.
-
Put the mashed banana into a bowl and dollop in the yogurt. Whisk together until well combined.
-
Using a spoon, scoop some yogurt and banana mixture into the bottom of each pastry cup.
-
Top with the banana chips, if using.
-
Place the cups (still on the baking tray) into the freezer and leave to freeze for a couple of hours until set solid.
NOTES:
Use favorite low-fat or full-fat yogurt based on your child's individual needs.
-
Use favorite low-fat or full-fat yogurt based on your child's individual needs.
-
To make dairy-free, use your favorite dairy-free yogurt alternative.
This tasty treat was inspired by a recipe here.
Clothespin Airplane
Who wouldn't love to fly like a bird? Well, if your little ones have ever wondered what it'd be like to be up in the clouds, this clothespin airplane is the next best thing. And a bonus: this unique and colorful craft can also be used later on as a toy!
What You'll Need:
-
1 Clothespin
-
2 Jumbo Craft Stick
-
1 Popsicle Stick
-
1 Button
-
Hot Glue Gun
-
Markers and/or paint to decorate
Instructions:
-
Cut the jumbo craft sticks into 3 equal pieces, making sure the two outer pieces are equal length. You will use the two outer, rounded sides from each for the plane wings.
-
Cut the popsicle stick into 3 pieces, making sure the two outer pieces are shorter than the middle piece. The longer middle piece will be cut in two later on (step 8) and used as the propeller blades.
-
Color the jumbo craft stick pieces, popsicle pieces, and clothespin using markers or paints.
-
Using the hot glue gun, glue the jumbo craft sticks to the center (or center-front) of the clothespin, making the plane's wings.
-
Turn the clothespin upside down and repeat with the two remaining jumbo craft stick pieces, so they're even with the wings on the opposite side of the clothespin.
-
Using the hot glue gun again, glue the two outer ends of the popsicle stick to the top back end of the clothespin.
-
Take the long middle piece leftover from the popsicle stick and cut it in half.
-
Using the hot glue gun, glue the two pieces of the popsicle left into an X. This makes your plane's propeller.
-
Then, use the hot glue gun to glue the button onto the center of the propeller.
-
Next, use the hot glue gun to glue the propeller to the front of the clothespin.
-
Once the glue has dried, it's time to fly!
This project was inspired by an activity here.
Elephant Toothpaste
Are your kids budding scientists, or maybe just want to see something cool? Then it's time to get your lab coats and goggles out! Camp Little Victors has created a step-by-step guide for making elephant toothpaste. The fun and easy science experiment ends with a spectacular effect. Watch the video and see below for step-by-step instructions on how to conduct your own version of this project.
What You'll Need:
-
Clean water bottle (or glass milk bottles)
-
1/2 cup 6% solution hydrogen peroxide liquid
-
1 tablespoon (one packet) of dry yeast
-
3 tablespoons of warm water
-
1 tablespoon of liquid dish soap
-
Food coloring
Instructions:
-
Place bottles in a tray or on a washable surface.
-
Pour 1/2 cup of hydrogen peroxide into the bottle.
-
Add about 10 drops of food coloring into the bottle.
-
Mix in 1 tablespoon of liquid dish soap into the bottle and swish the bottle around to mix it (this will create more foam in the reaction).
-
In a separate small cup, combine the warm water and yeast together and mix for about 30 seconds.
-
Pour the yeast water mixture into the bottle (a funnel helps).
This project was inspired by an activity here.
Watermelon Pinwheels
Are you looking for a sweet way to start up your family's DIY projects? These watermelon pinwheels are perfect to make during the warm, summer months. They look so real that you might have trouble convincing your little one they're actually paper!
What You'll Need:
-
Green and red construction paper (1 piece of each color)
-
Glue stick
-
Scissors
-
Single hole punch
-
Black marker
-
Green marker
-
Split pin / paper fastener (1)
-
Jumbo drinking straw (1)
Instructions:
-
Use the glue stick to glue your red and green pieces of construction paper together. This will give you one sheet that is red on one side and green on the other.
-
After the glue has dried, cut the construction paper into a perfect square. You can do this by folding one corner of the paper up until the bottom of the paper is in line with the top of the paper, making a triangle. Remove the excess paper.
-
Keeping the square folded in half as a triangle, start at the triangles point and cut two thirds of the way to the top of the paper.
-
Unfold the paper. Then refold into a triangle again, using the opposite corners of the paper. Again, starting at the tip of the triangle, cut two thirds of the way to the top (repeating step 3). Unfold the paper again. Your square will have cuts on each of the four corners.
-
Holding the square with one triangle point facing up, use your hole punch to make a hole at the top of the paper on the left side of the cut (about ½ an inch from the end). Rotate paper and repeat on the three remaining sides. The holes will be used to secure the pinwheels sails further along in the instructions.
-
On the red side of the construction paper, draw watermelon seeds using your black marker.
-
On the green side of the construction paper, use your green marker to draw lines of green that start at the hole punch and move down the paper. See video for illustration. This will represent the darker green rind of the watermelon.
-
Using the tip of the scissors, make a small hold in the middle of your square (a smaller hole than the hole punch would make). This will be used for the split pin (or fastener) to go through.
-
Using the hole punch to make a hold at the end of your straw, puncturing through both sides of the straw.
-
With the red side of the construction paper facing up, start with one side and grab hold of the hole at the tip of triangle. Gently fold down, exposing the green side of the paper. Place the split pin (or fastener) through the hole. Grab the next hole on the left, gently fold down and place the split pin (or fastener) through that hole. Repeat with the last two sides until the split pin (or fastener) is through each of the four holes. Push the split pin (or fastener) through the hold in the middle of the construction paper made by your scissors.
-
As the last step, work the split pin (or fastener) through the jumbo straw. Fold the flaps of the split pin (or fastener) down so it secures the pinwheel to the straw.
This project was inspired by an activity here.

Explore a variety of healthcare news & stories by visiting the Health Lab home page for more articles.

Department of Communication at Michigan Medicine
Want top health & research news weekly? Sign up for Health Lab’s newsletters today!